Hello again everybody and welcome to the November 2015 blog update for the Corkscrew-Lines. This year really seems to have flown by and although I look at the layout and feel disappointed with myself that I have not made more progress, I know in reality I have made significant strides this year which will certainly make forward progress from this point on so much easier. Lots of topics to cover this time and a return to some nostalgia with some of my recently scanned negatives and slides.
Oh and don't forget my corkette chums that a larger, higher resolution image can be obtained by clicking on a photo and to see all of the extra pages and earlier updates for the blog, it is best to view the web based version on a laptop rather than using a mobile phone or tablet.
Hope you enjoy my latest effort so buckle up everybody - here we go!
 |
| Return loop track now sits under the first of the spiral sections |
Helix Progress
Last time my lovely Corkettes I left you with images of the first train running around the return loop on the lowest level of the helix. Before I could progress and start lowering the actual helix climbing sections into place I had to start installing the electrics to the loop and testing everything was working before it would all effectively became buried under the multiple levels above and far more inaccessible. My policy with regard to reliable electrics is to ensure every individual section of track has a pair or dropper wires soldered to it ready for connection to the DCC Bus. This does away with the reliance on the rail joiners to conduct the track power and is the recommended way to go when using DCC for control. I could legitimately be accused of using a sledgehammer to crack a nut because for the DCC Bus I use domestic 2.5mm twin and earth cable designed for household wiring. It is operation overkill for a model railway layout but I have found through experience on the first version of the Corkscrew-Lines that it is easy to install and work with, extremely robust and surprisingly economical when bought by the 50m roll.
 |
| Wiring is installed alongside and then under the tracks |
 |
| Channels are cut out of the foam trackbed for the wiring |
The problem with installing the electrics on a helix is you obviously cannot fit wires under the baseboard in the conventional manner because there will always be a train running below which will become ensnared and tangled up in them. Any future access to the wiring - should there be a problem (surely not) is also rendered almost impossible when it is fitted below the baseboard sections with only a few inches of clearance. Instead, I have surface mounted the DCC Bus wires and will be running them all the way around the helix in parallel with the tracks. This is the system I used previously with complete success so why change it? However, this time I want the Helix to be as much about form as it is about function. I have therefore decided to try and disguise the wiring as much as possible by giving it all a coat of matt black paint once fitted and tested. Slightly mad and almost certainly obsessive but I think it makes a huge difference to the appearance of the helix and to be honest doesn't actually take that much extra time to do.
The images will hopefully give you a good idea of how the wiring is installed using small plastic clips to keep it in position and also how I have cut through the foam underlay in certain areas to take the appropriate feeds to the correct rails. My soldering skills are unfortunately quite limited. Layout wiring and soldering is definitely one of those areas I consider to be a necessary evil and not something to be enjoyed. It is a form of torture which I consider to be character building - Dreadful! My soldering on the helix is robust and certainly works but I will concede it will not win any prizes for presentation - it is best described as agricultural. Probably just as well I coat it all liberally in some flattering black paint!
 |
| Twin & earth cable is taken from the drum after removing the plastic sleeve |
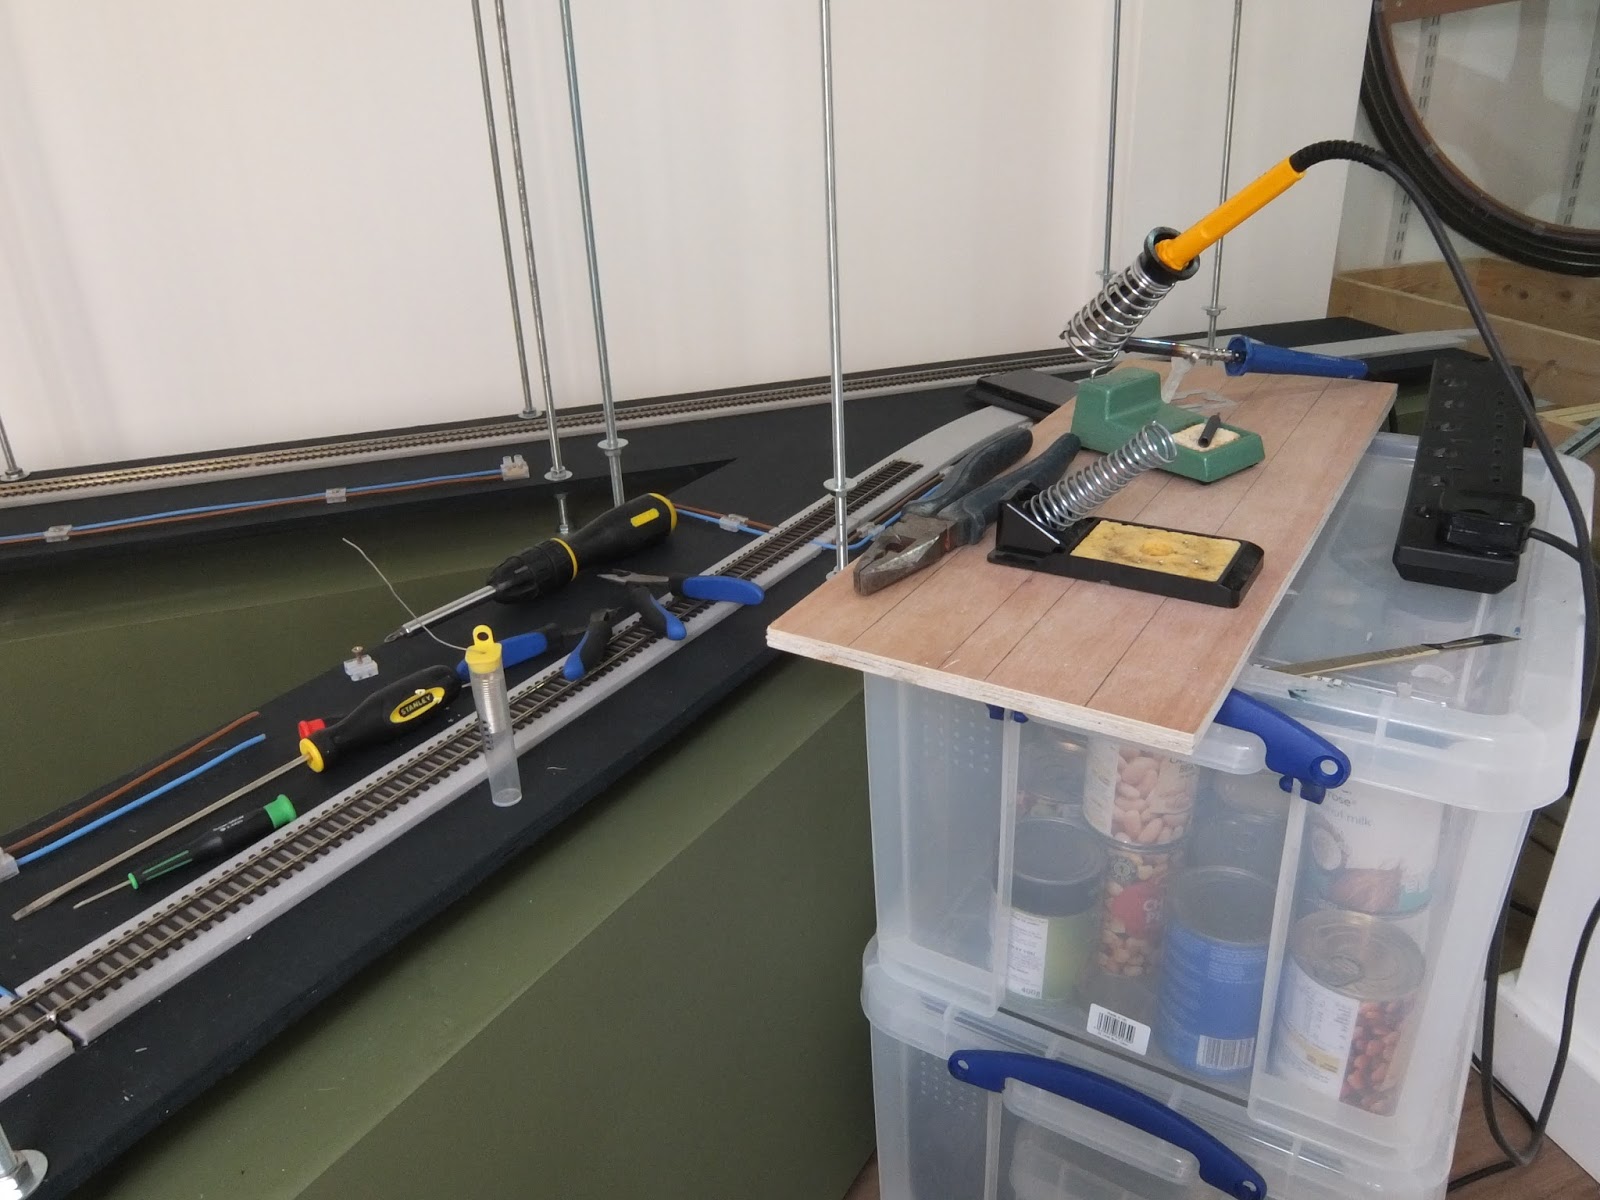 |
| Soldering of the individual feeder wires taking place |
So the return loop was installed and working well. The electrics had been tested and all was looking good so it was time to decide what to do next. I could continue track laying into the garage and the actual layout proper or I could start work on installing the helix itself and start the climb from level 1 to level 2. Having pondered on it all and after weighing up my options it made sense to me to start work on the all important climbing grades of the helix. The whole concept of the Corkscrew-Lines depends on the ability of locomotives to haul full length trains up the helix without any issues. There was no point starting to lay mainline tracks on the lowest level of the layout only to discover that typical trains heading for the helix were unable to ascend to the next level leaving the entire project in jeopardy. The first sections of the approach tracks and the first climbing grades of the helix were lowered onto the threaded rods and after adjustments and a bit of tweaking the foam trackbed was laid by using the techniques I covered last month. Once the actual uphill grade started I slopped on the Copydex and began to lay the first pieces of the DCC Powerbase system. I know already that the grade for the helix will be somewhere between 1 - 2% so I did not feel it necessary to lay the Powerbase on the downward spiral grade as the loco mechanisms will be unlikely to bind on such a gentle slope. Laying the components on the climbing grade was simple enough and I found the weight of my favoured tin cans method was more than enough to hold them in place whilst waiting for the glue to set.
 |
| Powerbase is glued to the climbing grade of the helix |
 |
| Note painted wiring on the return loop and first helix spiral begins |
You can see from the photos that the Powerbase sections are laid along the centreline of the track with the protective blue film uppermost. Just a couple of millimeters gap is required between each section. Thinking ahead I had pre-cut the foam underlay in places ready to accept the wiring and I had also snipped out small sections of the relevant metal Powerbase sections to make soldering the feeder wires much easier.
All in all this was an extremely straightforward system to use. The next stage once all the sections were firmly fixed down was to peel off the protective blue film and coat the sections with more Copydex ready to lay the track on top. The helix seems to swallow vast quantities of Peco Code 75 flexi track but it is a very simple process to lay it once you get into a rhythm with regard to gluing times and you have sufficient quantities of tinned foods ready to plonk on top. I really think the tins sytem is fantastically flexible as you can ensure nothing moves by stacking a pair of tins or you can just lay them on their side onto the rails with excellent even weight distribution. Always check first with the domestic authorities before emptying the larder - I learnt this lesson the hard way! Ouch!
 |
| Channels in trackbed and sections of Powerbase prepared for wiring |
 |
| The protective blue film is removed and the track is glued directly on top of the Powerbase and secured with tins until the Copydex has set |
 |
| Long sections of track can be laid as long as you don't run out of tins - Hellfire! |
 |
| The next trackbed section to be installed on the helix will complete the first complete turn and cover the approach tracks below |
 |
| Emergency supplies of specialist track-laying equipment have arrived! |
Remember to always keep in mind what your final preferred clearance is going to be once the first loop of the helix returns to sit above the level below. You can start with this clearance distance and then work your calculations backwards dividing up the entire circle into equal distances. Fine tuning with the nuts and washers is easy but time consuming so getting everything more or less correct height wise before you begin to lay track will certainly make your life easier. At this point I have laid the approach and three quarters of the first turn and when I get an opportunity I will be installing the wiring using the system I have detailed above. I am hopeful that I will be able to show you the first completed turns of the helix in the next update. They will be fully painted and wired and I will know exactly what my percentage grades are and I will be able to tell you all about fitting the Powerbase magnets to locomotives and the differences in haulage capacity this has made.
Full Sized Adventures
A few weeks ago Mrs Corky and myself once again met our great mates Jo and Neil for a day of exploration, tea drinking and fine dining - Hellfire! Neil had volunteered to sort out an East London based itinerary for the day that would include plenty of fun activities with a transport theme and enough tea stops to satisfy Jo's insatiable urges for tea and cake! I did of course also partake of the aforementioned tea and cake but only to be sociable you understand. I derived absolutely no pleasure from its consumption - Oh My Lords! - Dreadful!
The first train based leg of the adventure took us from the south coast to London Bridge station (somewhere I know far too well) and following a quick change onto a South Eastern service we were headed to the delights of Woolwich Arsenal and at Jo's insistence, our first cafe stop for refuelling. From there we embarked onto the fascinating Woolwich Ferry for a brief voyage across the Thames before hitting the Docklands Light Railway and another tea stop at the Thames Flood Barrier - Jo was once again getting thirsty! Next it was a brisk walk to the Royal Victoria Dock and then onto a cable car back across the Thames - Hellfire!
Time for another mode of transport - a Clipper boat from Greenwich to Blackfriars and time for food in a nearby restaurant. Then a leisurely walk to London Bridge station via the Southbank and a southbound Thameslink service took us back to Sussex and a well deserved pot of tea and a cake at Jones-Towers. Well done Neil - an excellent adventure - you officially have the adventure and expedition planners job full time from now on!
 |
| South Eastern Networker departs Woolwich Arsenal station |
 |
| One of the 3 Woolwich ferries |
 |
| Casting off from the loading ramp structure |
 |
| The brave and adventurous explorers pose for a group shot |
 |
| The grade II listed entrance to the Woolwich Foot Tunnel |
 |
| The old and now disused North Woolwich Railway station was the original terminus of the Great Eastern Railway line |
 |
| King George V railway station on the Docklands Light Railway |
 |
| Pontoon Dock station on the DLR with cable cars in the distance |
 |
| Magnificent cranes at Royal Victoria Dock |
 |
| Sunborn at Royal Victoria Dock is a floating hotel |
 |
| Cable-car nonsense and adventures |
 |
| Cable-car nonsense and adventures |
 |
| Cable-car nonsense and adventures |
 |
| Greenwich Peninsula Cable-car station |
Latest Arrivals on The Corkscrew-Lines
This has been a fantastic month for new steam era releases. You will recall I mentioned the Kernow Adams O2 last time and I have now included some more images of this little gem as promised. But another ex LSWR beast has just arrived on the scene and to be honest I am even more impressed with this latest Hornby release. The O2 was great but the S15 is an absolute belter. Fantastically detailed and an absolute peach of a runner straight from the box on it's first run on the test track. This could well be my favourite steam loco and considering I already have Bullied Pacifics and Brittanias on the roster that really is high praise. So impressed have I been with the last few steam locos from Hornby that I have actually cancelled my pre-order for the Adams Radial by Oxford Rail and switched my order to the forthcoming Hornby model. The final exciting release, which will almost certainly be paired up with my Bachmann Pannier tank, is the Bachmann Hawksworth Autocoach in lined maroon. A fantastic model and a wonderful free runner which will be ideal for the branch line services on the layout up on level 3 when I eventually climb that high.
 |
| Kernow Adams O2 with accessories and fire-irons packs |
 |
| Fantastic paint finish and lettering |
 |
| The Westinghouse pump and associated plumbing for push-pull operation is extremely intricate and extremely impressive |
 |
| Magnificent is the only word to use when describing the Hornby S15 |
 |
| My recently arrived ex LSWR "little and large" pairing ready for their new lives working on the Corkscrew-Lines |
 |
| Bachmann Hawksworth Autocoach - Delightful |
 |
| Bachmann Hawksworth Autocoach - Delightful |
It has always been part of the master plan to have a Southern steam shed on level 2 of the layout. I have a large stud of steam locos now and I would love to have a medium sized loco facility with a 4 road shed, coaling and ash roads and a turntable which will be essential as there will be a terminus station on this level with mainly steam powered passenger workings. To give me time to prepare for the turntable's installation and operating I have purchased a Peco kit and the associated meccano based kit of parts to manually motorise it. This is a kit to be built as and when I get a spare hour and don't fancy trekking out to the garage through howling gales and snowdrifts - you get the picture I am sure. More mundane arrivals include a wonderful Austin Cambridge from Oxford Diecast which is just like the car I remember my uncle Fred driving - Dreadful!
 |
| Turntables have a reputation for being tricky to install and so I hope all goes well with my new Peco model and the meccano gubbins needed to turn it. |
 |
| Oxford Diecast Austin Cambridge - Absolutely Hellfire! |
 |
| Oxford Diecast Austin Cambridge - Absolutely Hellfire! |
Finally, as Corky has just celebrated yet another birthday, a few books have winged their way to Jones-Towers. I can heartily recommend all 3 of these fantastic tomes for their superb reproduction of some quite exquisite images of the wonderful railway long since passed.
 |
| More bedtime reading! |
Visiting Corkettes
To be absolutely accurate it was Mrs Corky and I who visited Wibble - that well known scallywag and reprobate and long term Corkette, and not he who visited us, but let's not be pedantic. Mr & Mrs Wibble have moved to a new Wibble-Towers and it was an absolute pleasure to visit them in their little corner of Essex the other weekend. The really exciting part of the visit was discussing and planning what could be done with the tandem garage and large garden at the new house - my suggestions would need quite a few boxes of flexi track - Hellfire! After a hearty pub lunch we were taken on a tour of the local area by our hosts and this included visiting the wonderful Stansted Mountfitchet Windmill featured below.
 |
| Sails and Flails! |
Memory Lane
Thinking about the visit to the Wibblers in Essex got me pondering on some of the images from the early eighties that I have recently scanned. I thought I would dig out some shots from the GE mainline when men were men and trains had lumbering diesels at the head - none of this electric multiple unit nonsense. As a driver I signed most of the routes on the Great Eastern including Norwich to Broxbourne, Ely to Felixstowe via Ipswich, All of the Norfolk branches from Norwich and Manningtree to Parkeston. One of my first driver training trips with class 317 units was filling in for a failed class 86 by working the 8 car set from Norwich to Liverpool Street in the path of the disgraced loco hauled set - happy days! I have cobbled together a few images from 1982 which I hope you will find of interest. Some are not great quality but the trains hopefully make up for any inadequacies with regard to faded colours and grain!
 |
| 37 261 at Parkeston - 27.02.82 |
 |
| 08 750 at Harwich Town - 27.02.82 |
 |
| 40 195 at Parkeston Quay |
 |
| 47 580 at Manningtree |
 |
| 47 583 at Colchester - 27.04.82 |
 |
| 40 084 at Liverpool Street |
 |
| 37 023 at Liverpool Street - 01.05.82 |
 |
| 37 118 at Audley End |
 |
| 37 054 at Audley End |
 |
| 31 411 at Audley End - 01.05.82 |
 |
| 45 076 at March |
 |
| 33 025 at Liverpool Street - 08.05.82 |
 |
| 47 011, 08 494 & 31 179 at Temple Mills Yard - 01.06.82 |
So there you go, another update concluded. Next time I will reflect on this year's overall progress and hopefully share with you my experiences so far with running trains up the helix. Will the DCC Concepts Powerbase system live up to expectations and will the revised design of Helix be up to the job of getting relatively small locos with relatively long trains between the levels? - all will be revealed next time my friends - Dreadful!
If online gossip and reports are to be believed then then I could have a house full of Edwards in the next couple of weeks - that's little EDs to be precise. Dapol are saying the locos are going to be here imminently - fantastic news. If any class 73s arrive then rest assured you'll be seeing them in the next update.
As I type this the news of new releases is escaping from the wonderful madness that is the Warley show. Some things of interest to me are the Heljan Class-B oil tanks, the Oxford Rail Janus 0-6-0 diesel and the Rapido/Locomotion Prototype HST - although I await clarification with regard to suitable coaches. Thankfully it seems there will not be the same level of pre-order action for 2016 giving my wallet a well deserved rest!
Take care my friends and I'll be back just before Christmas - Oh My Lords!
That's all for now folks!
Corky!